Manage relays
Relays and mass-starts often have forking courses. As an organiser you need to connect multiple courses to their respective class. The same also applies when so-called butterflies or phi loops are used in course setting. By default, Livelox will display all forking variants for all of the classes’ relay legs in the replay and leg view. It is also possible to see the forking variations for a single relay leg or for multiple relay legs that are forked against each other. Read more about this below. In the table view, only the common controls are shown.
Connect multiple courses to a class
Make sure that all courses/forking variants have been uploaded in the section Courses. OCAD and other course setting programs include each of the forking variants as their own course when exported, so it is no different than to upload courses for a normal event. It is preferred but not necessary to upload course prints in SVG or PDF format for each course.
A tip is to upload a single course print including all forking variants for a class or a group of relay legs. Then you connect it to the first forking. Leave all other forkings unconnected to course prints. This method keeps Livelox from displaying control numbers for each forking on top of each other, ensuring an uncluttered view.
If the event is not connected to Eventor, then the first time you save the course you are asked if you would like to automatically create a class for each course. Answer no to this question, otherwise a new class will be created for each forking variant that is saved which you don’t want to happen.
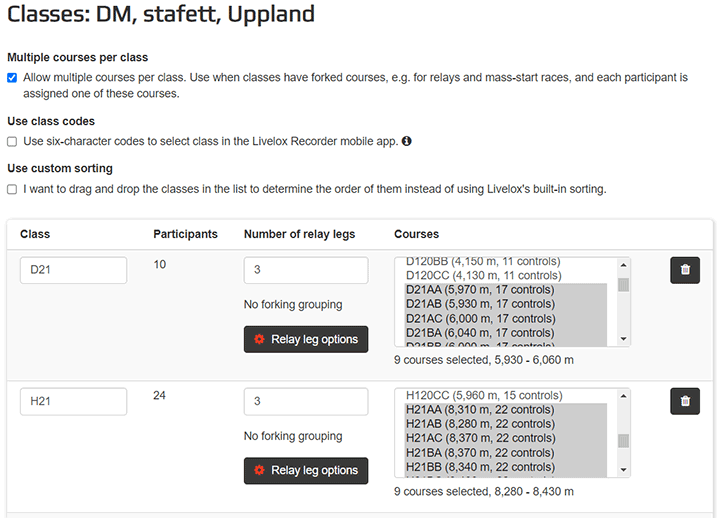
Next, go into the section Classes for an event. Here you add in the column Number of relay sections how many sections each class has. At the top there is a check box that is called Multiple courses per class. Check that box. You then have the option to mark multiple courses for each class. Make sure to mark all course that are used for each class in the column Courses. Hold the Control button (or Command for Mac) to choose multiple courses.
Grouping of forkings
In some relay classes, the relay legs have the same length and are forked against each other while other classes have different lengths and forking for the relay legs. When you look at a relay leg in the viewer, you usually only want to see the legs / fork variants that belong to that relay leg, and any other relay legs that have the same set of forkings. The remaining forkings should be hidden.
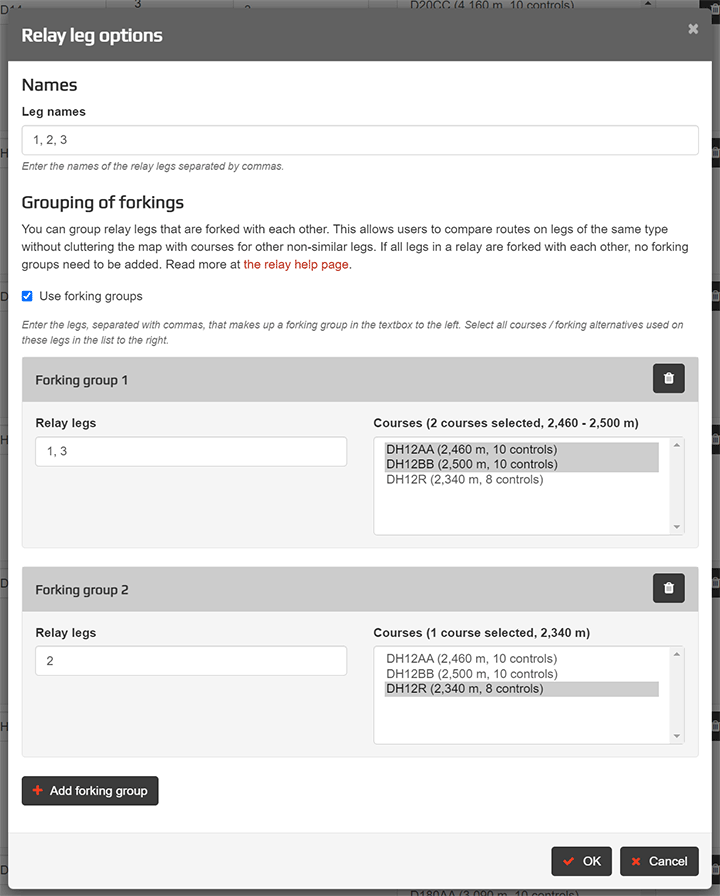
Livelox makes this possible by forking groups. A forking group consists of one or more relay legs that are connected by one or more courses. The concept is explained best with an example:
The class W12 has three relay legs. The first and third leg are forked against each other and include forking variants AA, AB, BA, BB. The second relay leg is unforked; let's call the forking variant C. In total there are therefore five courses. This corresponds to two forking groups:
- Relay leg 1 and 3 - courses AA, AB, BA, BB
- Relay leg 2 - Course C
The Open class is set with three unforked relay legs. The courses lengths are different for each leg. In total there are therefore three courses. This is equivalent to three forking groups:
- Relay leg 1 - course A
- Relay leg 2 - course B
- Relay leg 3 - course C
Class H21 has three relay legs that are all forked against each other. No forking groups need to be created in this case. Livelox assumes that all forkings are used in all relay legs.
Livelox automatically shows the right forking for each relay leg in the viewer when forking groups have been specified. In addition, links are created for replay of all relay legs that are part of the same forking group.
Click on the button Settings for relays next to a class to edit the forking groups.
 Our new, future-proof tracking model delivers even better precision and battery life. The obvious choice for live tracking - order it directly from the online store.