Add courses
Topics
- Direct upload of maps and courses
- Export and import files
- Export course print files from OCAD
- Import course setting file and course print files in Livelox
- Classes with multiple courses
- Rogaining / score orienteering
As an organizer of an event you need to add the courses for the event. This can be accomplished in a few different ways.
- Direct upload of maps and courses from OCAD (OCAD 2018 and later).
- Direct upload of maps and courses from Condes (version 10.2.7 and later).
- Import courses in IOF XML format, which is the standard format for exchanging course and control information.
- Import course setting files from OCAD and Purple Pen.
- Import courses exported in KMZ format from Condes.
In addition there is support for course print files in PDF and SVG format.
Direct upload of maps and courses
In the OCAD and Condes course setting software, there is built-in support for uploading maps and courses to Livelox. This method is preferable to exporting and importing files thanks to that maps and courses are automatically georeferenced, and that the coure prints with control numbers, cut connection lines and control circles, forbidden areas, etc. are transferred exactly as it looks in the course setting software. In addition, the whole process is quicker.
Direct upload in OCAD
OCAD 2018 and later versions support direct upload. Make sure that you have the latest OCAD update installed. Select Course setting > Upload to Livelox... in the OCAD menu and follow the instructions. For more information, see the OCAD wiki.
Direct upload in Condes
Condes supports direct upload starting with version 10.2.7. Select Export > Upload maps and courses to Livelox... in the Condes menu and follow the instructions. For more information, see the Condes documentation.
Export and import files
When you navigate to the Courses section of an event for the first time, naturally there are no courses available. You must first create a file with the necessary information.
Export course setting files from OCAD
If you are using an older version of OCAD than OCAD 2018, you will need to export files from OCAD and then import them into Livelox. OCAD 9 or later supports exporting course setting files in the IOF XML format. The description below applies to OCAD 11, but the same principle should hold for version 9, 10 and 12. It assumes that you are familiar with course setting in OCAD, and that the courses are set.
- Open the course setting file in OCAD.
-
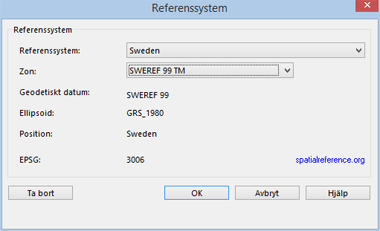
If the course setting file is georeferenced it is easier to fit the course to the map in the following steps, but it is not necessary. In order to georeference the course setting file choose Map > Select scale and reference system in the menu. Ensure that the right reference system for the background is chosen. Click on the button Choose to select a reference system.
-
Choose Course Setting > Export > Couse (XML, IOF version 3.0) in the menu. A file with control positions and course is created in the location you specify.
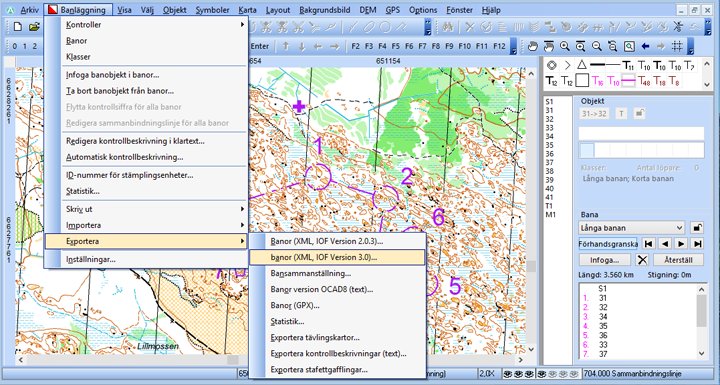
OCAD 8 is missing the function to export IOF XML files. In this case, you can instead use the course setting file in the next steps.
Export course print files from OCAD
In OCAD it is possible to cut control rings and connecting lines so that important map details are visible. It increases readability and gives the participant a sense of quality. The control numbers can also be moved, which is useful when controls are close to each other. This information will not be included in the IOF XML files, which only contain coordinates for the controls and which controls are included in each course.
Livelox can create a course print based on IOF XML files, but without cut rings and lines, markings for forbidden areas and adjusted placements of the control numbers. In order to make the course look exactly like in the course setting program, you need to export a vectorized course print file in PDF or SVG format for each course. This is not mandatory, but as said, it makes the overall experience nicer. OCAD 9 and later versions support exporting course prints in PDF format. OCAD 10 Professional, OCAD 11 Professional, and OCAD 12 and later versions support exporting course prints in SVG format. To create SVG files, the principle is the same for PDF files:
- Hide the course setting symbols that should be excluded from the course print. In particular, make sure that the control description is hidden, as otherwise Livelox may find it difficult to position the course print. Right-click the symbols in the symbol panel on the right and selectHide.
- Make sure that the background map and any background images are hidden. Choose Background > Hide all in the menu.
- Make sure that the display mode is set to Normal. Choose View > Normal in the menu.
- Choose File > Export in the menu.
-
In the Export panel, make sure that the settings are in line with the screen shot below. The scale for exporting should be the same as the map scale. Make sure to adjust the map’s size so that all objects are included. Click Export when all choices have been made. If you get a message saying that the map must be exported in raster format, you have failed to hide a background image in the previous steps. If so, cancel and go back to fix it.
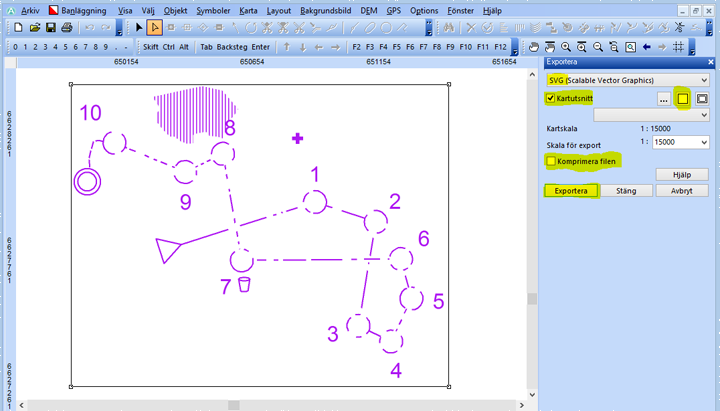
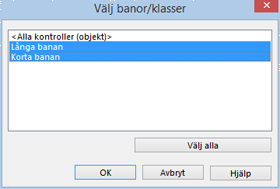
Choose the courses that course prints should be created for. Do not include <All controls (objects)>. After clicking OK you get to choose which folder you would like to save the first file in. Do not change the name of the file. One file for each course will be created in the folder you specified after clicking Save.
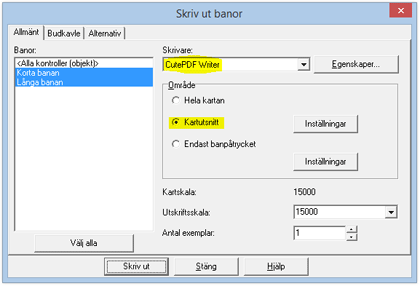
If you are using OCAD 8 you can not export to SVG or PDF. But there is a workaround that can be applied. Make sure that a PDF maker/printer is installed, for example, CutePDF Writer. In OCAD 8 make sure that the background map and any background images are hidden and then choose File > Print . In the print dialog box that is comes up, choose the PDF print option. Choose Map extract and mark the section of the map in the following way: Mark the course you will export and click Print. One PDF file per course is made.
Import course setting file and course print files in Livelox
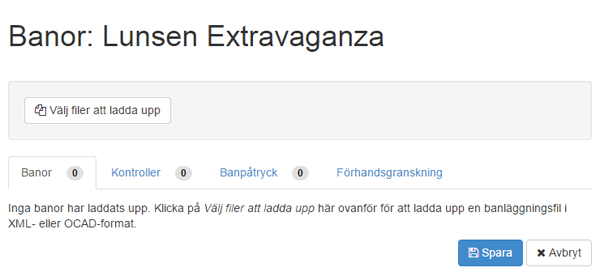
When files are exported from OCAD or another course setting program, it is time to upload them to Livelox. In the section Courses, there is a button Choose files to upload.
The following file formats can be uploaded:
- IOF XML files, version 2.0.3 and 3.0 (.xml)
- PDF files (.pdf)
- SVG files (.svg)
- Course setting files from OCAD 8, 9, 10, 11, 12, 2018 and later (.ocd)
- Course setting files from Purple Pen (.ppen)
Choose all files that you exported, both course setting files (they usually end with .Courses.xml if it is an IOF XML file that has been exported from OCAD) and course print files if such files exist. You can choose multiple files at once. When files are uploaded the information can be reviewed under four tabs.
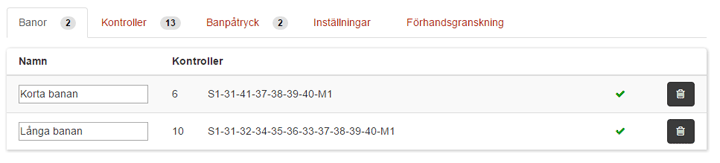
The Courses tab
Here you see the courses included in the file, and the order of the controls. A course can be removed by clicking the button with a trash can to the right. A green check means that the web has a vectorized course print attached to it.
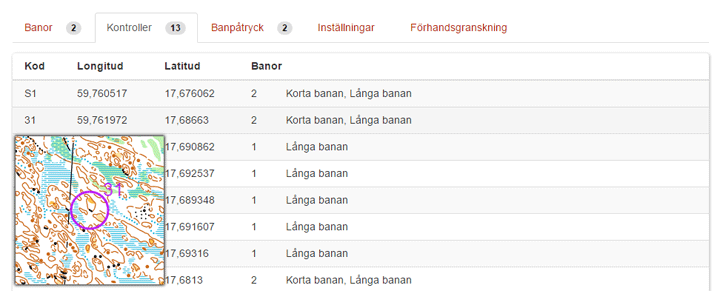
The Controls tab
Here you see a list of the controls that are in use and the courses that use them. Hover your mouse over a control to show the control's position on the map.
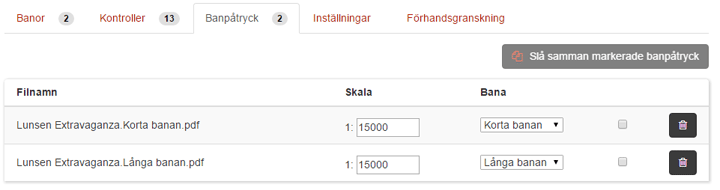
The Course prints tab
Here you see all the uploaded course print files. You can specify the course print scale and which course to connect the course print to. Normally these options are pre-chosen.
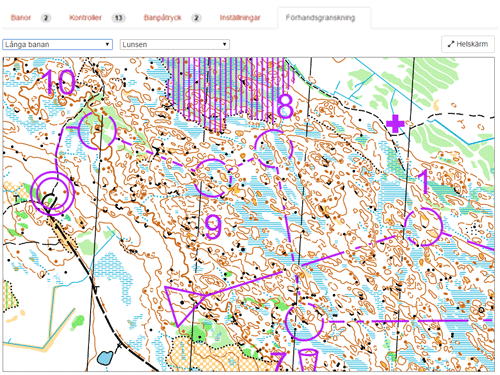
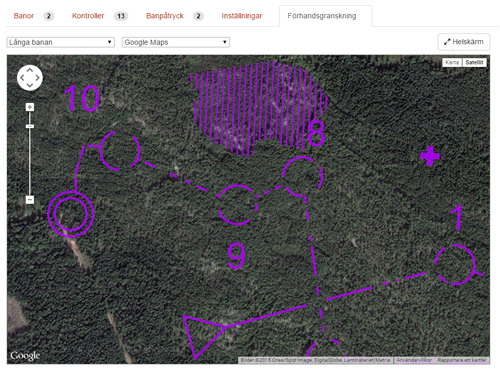
The Preview tab
Here you check that the controls and course have ended up in the right place. At top, there are two scroll lists. In the first you choose which course should be shown. It is also possible to choose All controls here. In the other you choose the backgrounds map: either the uploaded map or a satellite picture from Google Maps. Use the mouse’s scroll wheel to zoom in and out. You can also click on and drag the map picture to move it.
If the uploaded course setting file is not georeferenced, for example of you have uploaded it from OCAD 8, you need to drag the “control cloud” manually to the right place with the help of the mouse. Follow the instructions as they are shown.
Save
Once you have verified that all the information is correct, click the Save button. If there are no classes in the event, you will receive a question if you want to create classes based on the courses. It is convenient for smaller events when there is usually one class per course.
If you need to make changes to the courses, export a new course setting file and new course print files and upload them again. The new information replaces the existing information.
Classes with multiple courses
If the event includes classes with forked courses, as for example relay races or courses with loops or butterflies, you need to connect multiple courses to each class. Read more about working with relays and multiple courses per class.
Rogaining / score orienteering
If the event is of rogaining (score orienteering) type, where the controls may be taken in any order, upload a course file that contains only controls, no courses. Under the Classes section, select the Rogaining option for desired classes.
 Our new, future-proof tracking model delivers even better precision and battery life. The obvious choice for live tracking - order it directly from the online store.