Upload a route from a file
The automatic synchronization with Garmin Connect, Suunto App, Polar and Coros and the live recording with the Livelox Recorder App and Livelox GPS trackers are the preferred ways to upload a route to a Livelox event. If you for some reason can't use automatic synchronization, there is an option to upload your route directly from a file. If you have a GPS watch, you can usually download the route file from your watch's accompanying app or website. The most common file format for routes and other geographic information is GPX. Other common formats are TCX and FIT.
Below are instructions for how to create a GPX file in Strava. To create a GPX, TCX or FIT file from another web service, check the user guidelines for that specific service on its website.
The following steps will show you how to export a GPX file from your Strava activity and how to upload it to Livelox using a computer. Note that Strava only supports exporting GPX files using a web browser at strava.com. The Strava mobile app doesn't support exporting GPX files.
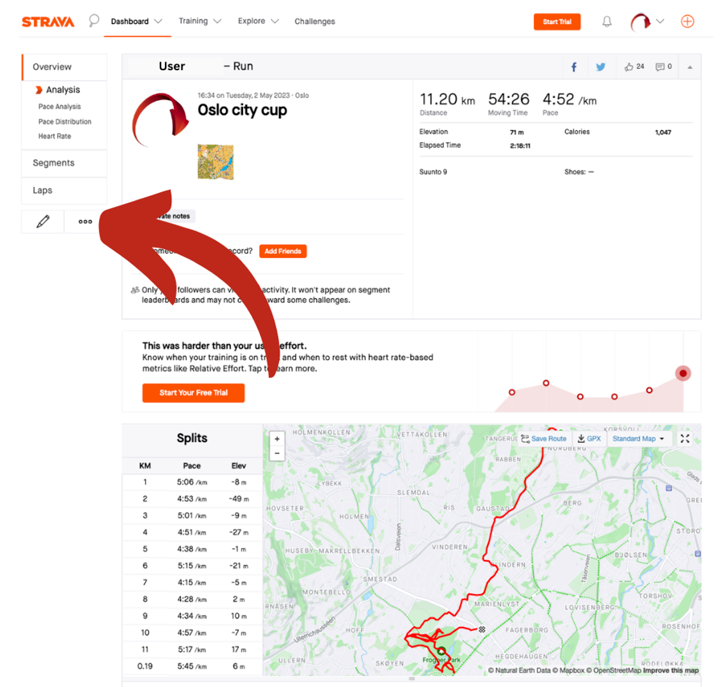
- Go to Strava and select the activity that you want to upload to Livelox.
-
On the left side of the screen, click on the three dots to access the activity menu.
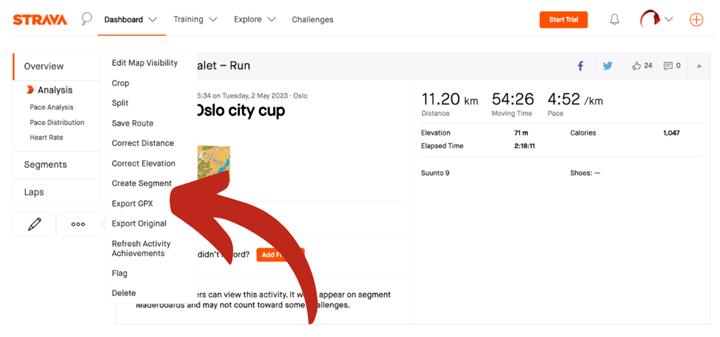
-
From the side menu, select Export GPX.
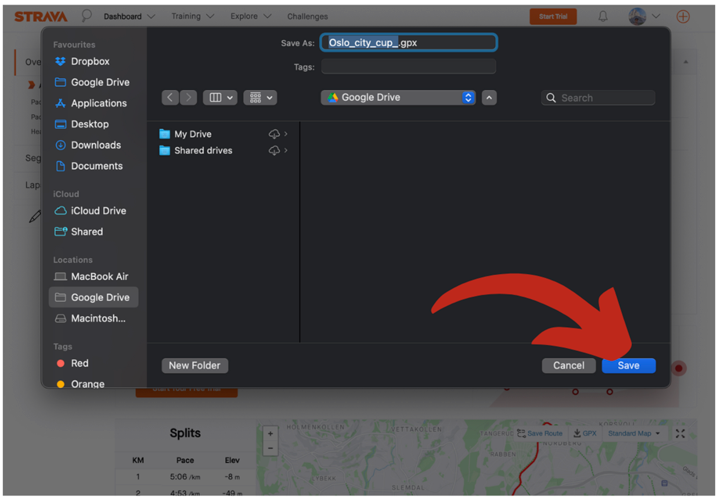
-
Save the exported file in a folder on your device that you can easily find and access.
-
Here at livelox.com, log in via the login link at the top right.
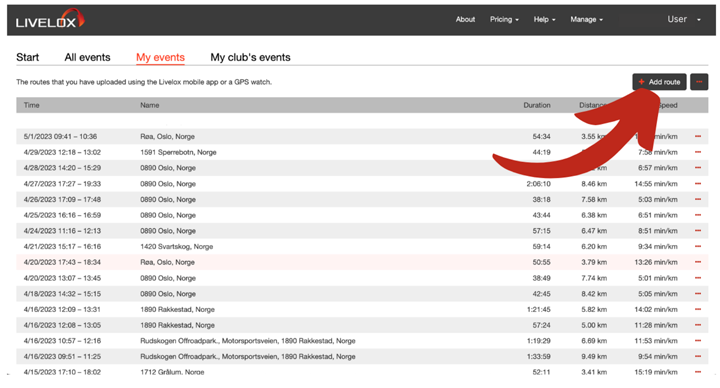
-
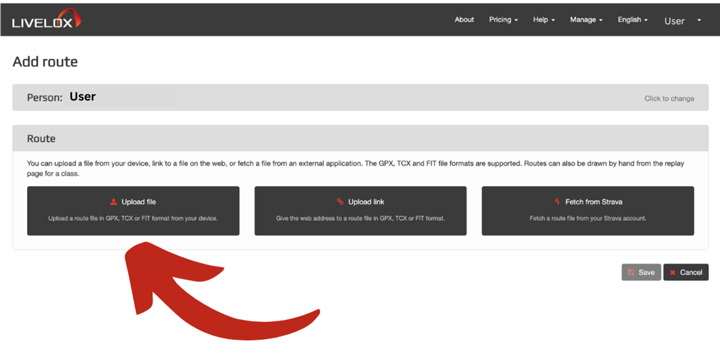
Select the tab My events on the start page. Click on the button Add a route.
-
Choose the person that the route belongs to, and click on Upload file. Find the route file that you just created.
-
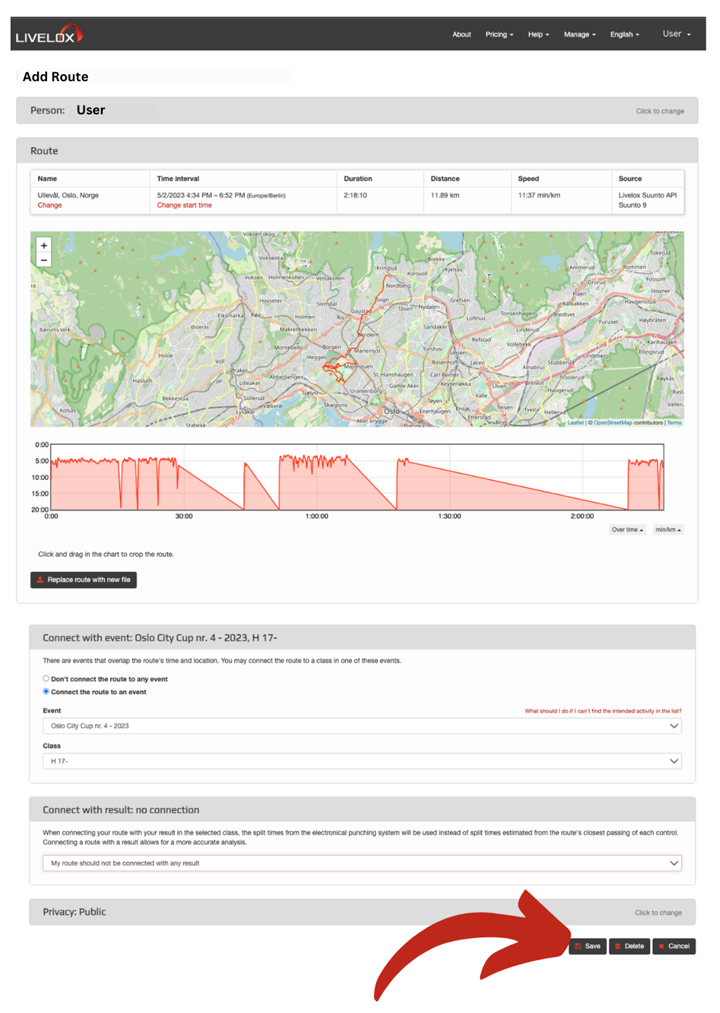
When the file is uploaded, information on the routes time and distance are shown. If the route overlaps an event in Livelox you have the option to add your route in that event. In that case, choose the event and class it belongs to. If the event organiser has connected results to the event, your route will be cropped based on the start time and finish time. The best matching result is set as default.
Normally a GPS watch is set based on the GPS satellites's clock. However, if the time for a route should need to be changed, you can click on the link Change start time. This can be useful for example, if you have run a course at another time point than the time period of the Livelox event you want to add your route to. Update the start time to a time within the time interval for the event and then connect the route to the event.
Finally, click Save, and the route will be added to the event..
ルートファイルのアップロード
Garmin Connect、Suunto App、Polar、Corosとの自動同期、Livelox Recorder AppとLivelox GPSトラッカーとのライブ記録は、Liveloxのイベントにルートをアップロードする望ましい方法です。何らかの理由で自動同期ができない場合、またはLiveloxへのルートのアップロードをスピードアップしたい場合は、ルートファイルを直接、アップロードする方法があります。GPSウォッチをお持ちの場合、通常はウォッチの付属アプリまたはウェブサイトからルートファイルをダウンロードできます。ルートやその他の地理情報の最も一般的なファイル形式はGPXです。その他で一般的な形式はTCXとFITです。
以下は、StravaでGPXファイルを作成する方法です。他のウェブサービスからGPX、TCX、FITファイルを作成するには、そのサービスのウェブサイトの利用ガイドを確認してください。
次のステップでは、StravaのアクティビティからGPXファイルをエクスポートし、Liveloxにアップロードする方法を紹介します。Stravaは、ウェブブラウザでstrava.comを閲覧したときのみにGPXファイルのエクスポートをサポートしています。StravaのモバイルアプリはGPXファイルのエクスポートをサポートしていません。
- Stravaにアクセスし、Liveloxにアップロードしたいアクティビティを選択します。
-
画面左側の三点マークをクリックし、アクティビティメニューにアクセスします。
-
サイドメニューからGPXをエクスポートを選択。
-
エクスポートしたファイルは、デバイス内のフォルダに保存してください。
-
livelox.comでは、右上の「ログイン」をクリックしてログインしてください。
-
スタートページのマイイベントタブをクリック。 ルートを登録ボタンをクリック。
-
ルートの対象となる競技者を選択し、ファイルのアップロードをクリックします。先ほど作成したルートファイルを選択します。
-
ルートファイルがアップロードされると、ルートの時間と距離が表示されます。それらがLiveloxのイベントと一致している場合、そのイベントにルートを追加するオプションが表示されます。その場合、登録するイベントとクラスを選択してください。イベント主催者がイベントに結果を登録している場合、スタートとゴールの時刻にもとづいて表示されます。通常、最も一致する成績が採用されます。
通常、GPSウォッチの時刻はGPS衛星の時計にもとづいて設定されます。ルートの時間を変更する必要がある場合は、スタート時刻の変更というリンクをクリックしてください。これは、ルートを追加したいLiveloxイベントとは別の時間にコースを走った場合などに便利です。スタート時刻をイベントの競技時間内に変更して、ルートをイベントに登録してください。
最後に 保存をクリックしてください。ルートがイベントに登録されます。
 将来の規格にも対応した新しいトラッカーデバイスは、精度とバッテリー寿命が大幅に向上しています。ライブトラッキングの本命として、オンラインストアから直接ご注文いただけます。