Add events
Topics
- Event connected to a competition or training in Eventor
- Event not connected to Eventor
- Fill in the event’s details
- Classes
- Maps
- Courses
- Administrators
- Access restrictions
As an event organizer, you need to add events, classes and courses in Livelox so that participants in your events can compare routes in the easiest way. An event can be either a competition or a training. It is completely free to add events in Livelox. No subscription is required.
Event connected to a competition or training in Eventor
An event that is connected to Eventor will automatically be updated with classes, start times and results when new information is available in Eventor. Links to Livelox are seen in the competition information and results lists at Eventor. In order for an event to get connected to Eventor you have to go to Eventor to create it. You can not create it directly in Livelox! You need to have one of the following roles in Eventor: Event Organizer or Administrator for an organizing club. Go to the administration page for the competition or training in Eventor. There you click on the link Livelox and follow the instructions. You will then come to the step below where you Fill in the event’s details.
Event not connected to Eventor
To create an event that is not connected to Eventor, you need to be logged in to Livelox. Log in with your Eventor account if you have one. It is also possible to use a Livelox account, but then your Eventor club can not be set as the the organizer.
Choose Manage > Event in the menu at the top. Here you will see a list of events that you can administrate. The standard is to show all events within the last month and coming month from current date. Click on Add an event.
Fill in the event’s details
Fill in the event's name, start time, finish time and organising club. Set the start time to the first starting participant's start time, and finish time to slightly after the last expected finish time. Click on Save.
Now the event’s management page is shown. It is divided in different sections, for example general information, classes and courses. Each section has its own box displaying overview information. Click on the heading of a box to edit the details.
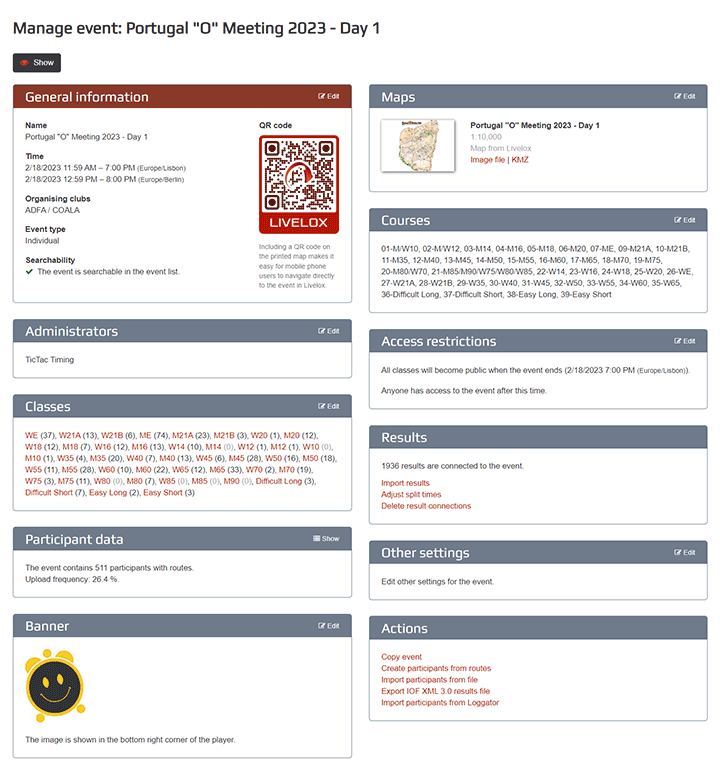
General information
The general information is already filled in from when the event was uploaded or imported. Here you can change the event's name, start time, finish time and organising club. It is important that the event's time interval is correct, because it is used to close the right event when participants upload their routes.
Connect to an external system
This heading is only seen if the event is connected to an external system, such as Eventor. Normally the classes, start times, and results are automatically collected from the external system, but if it doesn’t work you can request to synchronize the information.
Classes
Here you manage participants and link to courses for the classes in the event. Normally, courses are automatically linked to classes.
Participant information
Here you see how many participants have uploaded routes. If start lists or results are available, the total number of participants is also shown regardless of whether or not they have uploaded routes.
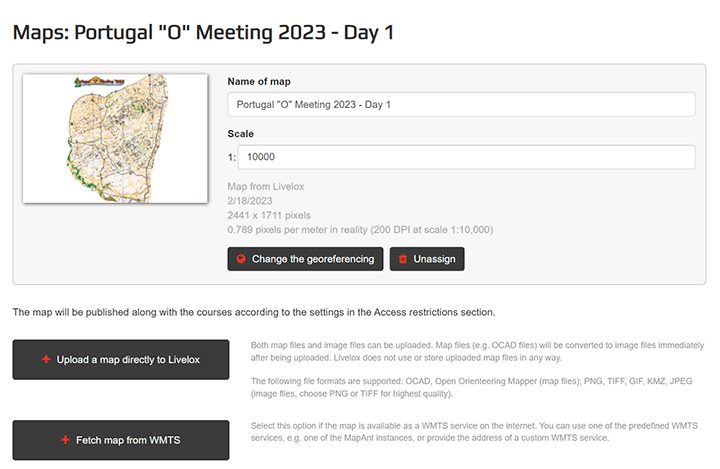
Maps
Under Maps you choose the maps which are connected to the event. Normally only one map is connected to an event, but Livelox allows different classes to use different maps. Maps can be collected from Omaps or downloaded directly in Livelox. Read more about how to add maps.
If the map covers a significantly larger area than the event’s courses, select one of the other options than Use the map's bounding polygon. This will make a large map load faster.
Courses
Under the section Courses you upload course setting files and course print files that are created in a course setting program. Read more about handling or courses .
Administrators
Here you add people which should have access to edit the event. The termrole includes a combination of the type of roll the person has and the club access, for example Administrator in OK Linné. The roles are taken from Eventor.
Access restrictions
Courses in an event are kept hidden until the start time that is set for the event under General information. Usually the courses ar made available after the last participant has started. Go in under the section Access restrictions and set a publishing time for either the entire event or per individual class.
It is also possible to set the event so that only members in the organising club have access to the event, or that the event is password protected.
Actions
Here is a collection of links for various actions. Create participants from a session is used to add routes that overlap an events time and place, but are not connected to any of the participants in the event.
 Our new, future-proof tracking model delivers even better precision and battery life. The obvious choice for live tracking - order it directly from the online store.