Live tracking with Livelox GPS Trackers
Our GPS trackers from Teltonika TMT250 give you and your club access to simple and flexible live tracking. Read more about our offer here. Read more about our offer here. This page contains information about how our trackers work, and how to connect them to participants in Livelox activities.
User manual Teltonika TMT250
Note! These instructions apply to Teltonika TMT250 trackers sold or rented by Livelox. Trackers of this model from other suppliers/stores are not programmed to send positions to Livelox and thus do not work together with Livelox.
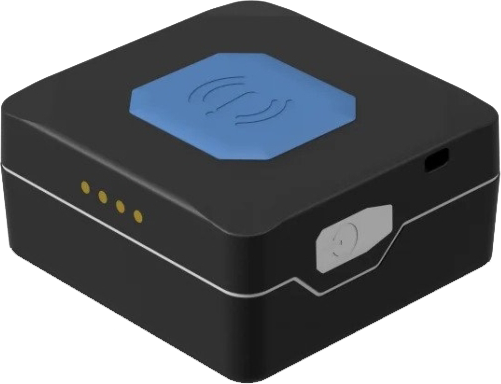
- Start the GPS tracker by pressing the white button with your thumb for 5 seconds. Then release the button. After a short while, three short vibrations are heard, and the diode flashes green and blue. The recording of positions is now underway.
- Turn off the GPS tracker by pressing the white button with your thumb for 5 seconds. Then release the button. After a short while, a long vibration is heard, and the diode lights up red for a few seconds before going out.
- When the GPS tracker is switched on, the diode shows the current status
- Two short green flashes every 10 seconds indicate contact with the satellites.
- A red flash every 5 seconds indicates that satellites cannot be found. Move to an open area with a good view of the sky.
- Four short blue flashes every 10 seconds indicates that a mobile network connection cannot be established.
- Four short red flashes every 2 seconds indicate that the battery level is below 10%.
- The GPS tracker's rechargeable battery lasts about 4-6 hours before it is time to charge it again. You can check the current battery status at www.livelox.com/devices/status/trackername, where you replace the tracker name with the number on the white label, e.g. www.livelox.com/devices/status/L001. ATTENTION! It is the status from when the GPS tracker was last turned on that is displayed.
- Charging of the tracker is done with the supplied USB cable. Attach the magnetic connector to the four metal pins on the side of the GPS tracker.
- During charging, the diode flashes green.
- When the battery is fully charged, the diode lights up with a solid green light.
- A full charge takes about 3 hours.
- ATTENTION! When charging several trackers at the same time, it is very important to make sure that all the magnetic contacts are connected to the charging pins of the respective tracker. There is a risk of short circuit if two magnetic contacts connect to each other.
- The GPS tracker has a large blue button that can be used to send an alert to any phone number. Hold the button down for about five seconds until the tracker starts vibrating and the LED flashes red. If an emergency telephone number has been entered for the tracker, a text message is sent with a link to the current position. Read more about emergency phone numbers in the settings section further down this page.
Practical Tips
- Turn on the GPS tracker about 10 minutes before your start time. If you have the opportunity, stand in an area with a good view of the sky and hold the GPS tracker in your hand with the blue side up. Stand still for a couple of minutes. Then the GPS tracker can make an accurate calibration against the satellites and the precision of the position will be high.
- Place the GPS tracker in a pocket or similar with the blue side pointing away from the body. Make sure to close the pocket properly.
- Turn off the GPS tracker immediately after finishing.
- The GPS tracker is dirt and water resistant.
Connection of GPS tracker to participant
When the tracker is delivered, it is either linked to a specific person or to a specific club, depending on what was specified when ordering. This link constitutes the tracker's permanent link, which can be adjusted as needed also afterwards.
In order for the track from a GPS tracker to be shown in Livelox, the tracker needs to be linked to a person and a class in an activity, i.e. a training or competition entered into Livelox. How the connection is made depends on the context. In some cases it is done automatically, in other cases manual hand application is needed. Here we go through the most common scenarios.
The GPS tracker is connected to you as a person
- If the activity belongs to Eventor, you are on the start list in Eventor, and you log in with your Eventor details in Livelox, the GPS tracker's route will automatically be linked to you and entered in the correct class. You don't have to do anything.
- In other cases, search for the activity and click on the Manage tracking devices link. Then click Add my tracking device and then Save.
- If the tracker has not been connected automatically or manually as above, it can in some cases be connected automatically when the recording of the route is finished. To do so, you need to have visited all the controls on the track, and the track can only be used by one class in the activity.
The GPS tracker is linked to your club, but not to any person
The concept of club-linked trackers is recommended when different people use them at different times in a club's activities. As a member of a club, you can connect all of the club's trackers to participants in activities, either to yourself or to other participants. In this case, the connection to participants only applies to the current activity.
- To connect a tracker to yourself, search for the activity and click on the Manage tracking devices link. Then click Add me. Next to your name, enter the designation that appears on the tracker's white label, for example L001. Click Save.
- To connect a tracker to another participant, search for the activity and click on the Manage tracking devices link. Then click Add New Participant.
- If the participant is in Eventor, select Add people from Eventor. You can add one or more participants in the dialog that appears.
- It is also possible to enter a name in free text without an Eventor connection. Select Add new participant.
Then enter the label name that appears on the tracker, for example L001. Repeat until all participants have been connected to each tracker. Click Save.
The GPS tracker is not linked to your club, but you want to add it to an activity that you administer
Follow the same procedure to add a participant who, under the GPS tracker heading, is linked to your club, but not to any person above. When you administer the activity, you can add trackers with any designation. They don't have to belong to your club.
GPS tracker information and settings
You can view information and manage settings for trackers that are permanently linked to you or your club. Club-linked trackers require you to be an administrator for the club. The administrator role is inherited from Eventor.
You can:
- create a shareable live tracking link for the tracker.
- add up to three phone numbers to which SMS can be sent when the tracker's alarm button is pressed.
- see the last active time, position and battery level.
- for trackers permanently linked to your club, also add a permanent link to a member of the club.
To manage a tracking device connected to you, go to your user profile and click on the tracker under the Tracking devices section.
To manage club-linked tracking devices, go to your user profile and click on the club's name under Clubs. On the next page, click Manage next to Tracking devices linked to the club.
Alarm
The tracker can send alarm messages via SMS. For participants without orienteering skills, it is safe to be able to call for help if they get lost. Up to three alarm numbers per tracker can be set on the tracker's settings page. After pressing the alarm button, it normally takes about 10 seconds before an SMS with details of the tracker, the participant's name and a link to the Livelox position. If the activity's map and tracks are not public, the position is displayed in Google's map service instead of in Livelox's playback view.
In the case of poor mobile network coverage, it may take some time before the alarm is received. This is beyond our control, and therefore we cannot make any guarantees that alarms will be delivered within a certain time.
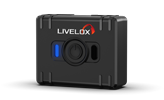 Our new, future-proof tracking model delivers even better precision and battery life. The obvious choice for live tracking - order it directly from the online store.